Rain too often gets a bad rap. Sure, it’s been known to ruin a few track and field days, picnics, and games. Of course, there is a legitimately destructive side sometimes associated with rain that can’t be overlooked. I guess everybody can find a reason or two to hate the rain. But aside from appreciating rain due to the simple fact that we need it, I think we should enjoy the rain for the same reason children do: it’s fun. And for photographers, rainfall represents an opportunity to let your creativity run wild.
Rain itself, however, no matter how photographer-friendly, isn’t camera-friendly and could do potentially irreparable damage to your equipment if you don’t take proper precautions.
So, it seems that a discussion on rain photography should not only consist of ideas and techniques, but also how to keep your gear dry and how to use rain creatively as the subject of your photography.
How to Protect Your Camera and Gear in the Rain
- Carry an umbrella. I know, having to hold something other than your camera is probably going to be a hassle, but carrying an umbrella is just an obvious first step. Granted, it’s not going to do you any good in strong winds, and you’re putting yourself at risk if there’s any lightning present; but it’s always better to have an umbrella around in a pinch than to not have it.
- Carry a raincoat. Not necessarily for yourself — nobody cares if the photographer gets wet. I mean a raincoat made specifically for cameras. These are available from a number of manufacturers in a variety of shapes and sizes, capable of covering not just the lens and camera but an attached flash as well. You can find a decent one for not a lot of money. If you’re more of the DIY type, you can use a plastic bag — preferably a clear one.
- Look for shelter. Depending on where you are, you might be able to locate a structure to stand under while you shoot; or, if you’re at home you can use your porch. Basically, an overhang of any kind will be or service.
What to Photograph While it’s Raining
One reason rain makes for an interesting subject is because it is such a transformative phenomenon. It can make familiar things unrecognizable; it brings out a wide range of emotions from the people caught in it — delight or frustration. There is nothing that goes untouched — or changed to some extent — by rainfall. This makes your photographic possibilities endless!
Consider taking photographs of:
- Reflections in puddles of water.
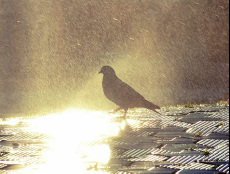
- Candids of people or animals playing in the rain or trying to protect themselves from it.
- Plant life decorated with beads of water.
- Landscapes transformed by rain.
- The range of emotions displayed on people’s faces in reaction to the rain.
- Water flowing from roofs, pipes, drains.
- People working in the rain.
- The rain itself.
Check out these amazing sites for rain photography!
35 Brilliant Examples of Rain Photography
Taking Photos in the Rain - National Geographic
13 Fab Photos of Rainy Days
80 Rain Photographs
How to Capture Rain
Rain can be surprisingly tricky to capture. Here’s how you can avoid dull gray rain photos:
- Shutter speed. Shutter speed will be the setting you want to most concern yourself with when capturing rain. Stating the obvious, rain is a moving subject; but what isn’t always so obvious is that rain is moving faster than we think. Decide how you want to portray the motion of the rain and set your shutter speed accordingly. If you want to show motion blur, use a slower speed; if you want to “freeze” the drops, you will need a fast shutter speed.
- Focal length. You can use any focal length you want to capture rain; keep in mind the compressing and magnifying effects of longer focal lengths, though.
- Flash. Using a flash at low power can produce a nice amount of “pop” and glimmer to raindrops.
- Backlighting. Rain is more clearly defined when it is backlit. Try to find a suitable light source and shoot into it, whether it’s the sun peeking through the clouds or a streetlamp or a lighted sign or some sort. The trick is to find the perfect shooting angle; you need to shoot into the light, but if you take too direct of an angle the light source will cause your shot to be overexposed.
We are caught in a week of rain, but don’t let it get you down. Take your camera outside this class and enjoy the downpour.
Take at least 20 photographs outside, playing with the settings on your camera:
- adjust the ISO
- change the effects - try toy camera, fish eye, monochrome, supervivid, and miniature
Change the composition of your photographs:
- adjust the angle (height) of your camera
- adjust the distance (try some long shots and close ups...can you get the camera to focus for an extreme closeup?)
- use the rule of thirds
- can you find leading lines?
Then, select the best of your shots, edit the photograph, and hand it in on Schoolzone.
Be sure to keep your camera dry!
A lot of these ideas and images and text was taken from http://www.lightstalking.com/learning-love-rainy-day-photography on May 29, 2014
